Monday, August 19, 2013

Washing and Conditioning a Worn Out Leather Bag

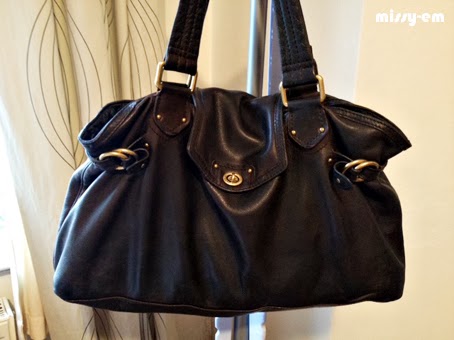
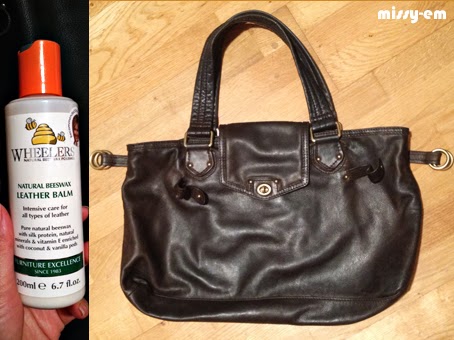
I bought a Marc Jacobs Tina turnlock tote at the charity shop for £55! It needed a good cleaning inside and out as the lining looked like eyeshadow had exploded on it and the leather was dry in some places. With a little TLC, I knew I could revive the bag and make it an aged treasure.

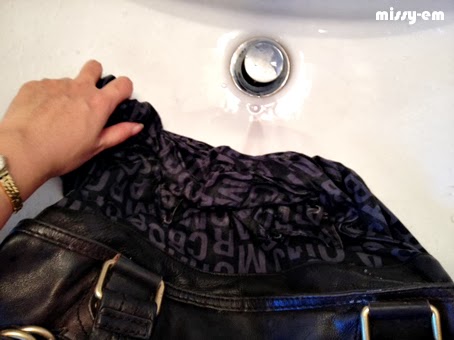
The most effective way of cleaning the lining was hand washing. While I don't recommend this on very expensive leather bags, I did'nt have too much to risk because the leather is dark brown so water stains was'nt too much of an issue.  

Step one: I turned out the lining and washed it thoroughly with detergent and warm water, being careful not to let the leather get wet. Keep a towel handy for sopping up splashes. When the water ran clear, I wrung it out and hung it up to dry, keeping the lining kept separate from the leather. 

Step 2: When the lining is completely dry, turn it back inside. Now it's time to condition the leather. I use Wheelers leather balm which is made from beeswax and is perfect for moisturising. Make sure the leather is clean so wipe it down if needed and unfasten buckles so you can access all areas. I squirt a 10p amount of balm on my palm and massage the leather all over with my hands. Pay attention to edges and dry areas. Keep applying more balm and work the leather until it feels like the upper layer is saturated. 

Step 3: Hang the bag up to dry over night. It will be a little sticky on the surface but the bag will be usable after a quick buff. With further use the leather will suck up the balm throughout and be lusciously thick and supple.

The bag is ready for use and the leather will beautify with age.

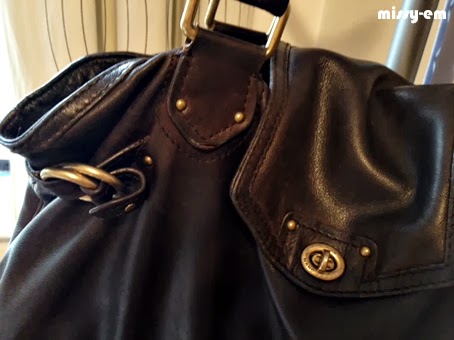
Tah dah! A reconditioned bag with smooshy buttery leather. 

Saturday, August 17, 2013

DIY Nail Repair With A Teabag And Nail Glue

My pet hate when growing nails is accidentally ripping them across the nail bed. However accidents happen and a tiny little tear turned into this as I was getting dressed. Quelle horreur! As you can see, the rip is over the pink of the nail and there was no way I was going to cut off the hanging bit.

I went to two beauticians near my work but they were both booked out. I had to resort to a DIY nail repair and it turned out to be effective and cheap, using nail glue and a teabag.


1) Start with a clean and dry nail.

2) Take a teabag and cut two small rectangles to fit over the tear, one larger than the other.

3) Place the smaller rectangle over the tear, add one drop of nail glue and use a paper clip to ensure that the paper covers the tear. Work quickly because the glue dries fast. (It's easier to handle with tweezers but I didn't want glue on mine.) 

4) The glue should still be a little gummy for the larger teabag piece. Center it over the first piece and add another drop of glue. Ensure that the pieces are well adhered, leaving no air bubbles.

5) Add another drop of glue or two to seal. Let the glue dry completely.

6) File the glued area with a course nail file. Then use a smoother file to buff the surface.

7) Here's the finished work-broken nail fixed! You can paint over the repair but nail polish remover will dissolve the glue (especially if using acetone). You will need to repeat this process until the tear grows out. 

Wednesday, August 7, 2013

Rayban Wayfarer 2140-A Asian Fit. Yes It Exists!

If you're Asian, chances are you've had problems fitting big plastic frames. I've wanted Rayban Wayfarers for ages but they they slide down my face. When I smile, my cheeks smudge the lenses. Ever had this happen to you?

It's especially frustrating because I wear glasses and have the same problems finding  frames. I have two pairs of new glasses going to waste because they don't fit and stick on silicone nosepads fall off. I'm still wearing the same plastic frames from 10 years ago because they actually fit me! The glasses are made by Ray Ban so they must be doing something right-especially when I found out they make an Asian Fit for Wayfarers.

I managed to track them down on Smartbuyglasses (known as Visiondirect in Australia). The catch is that I had to wait months for my order to be located in Hong Kong, sent to the company's warehouse and then dispatched. The latter step was really quick because they use a courier service, however they did at first send a normal fit pair in error and that was after six weeks of waiting! They offered a 5% discount for waiting (twice) so it worked out to only cost £80 including shipping. However these ones are made for the Asian face which is better than anything I could buy on the high street. 

The first I noticed was the frames are huge for a 54mm lens. So ladies, be aware this is the bug eyed version. Most opt for the 50mm lens and the classic style is the 47mm (which I found too small for my face.) 

The nose pads are more prominent than normal and I think narrower too (perhaps this might just be because of the 54mm lens version). I will have to get the arms adjusted so they fit around my ears but after that, they are a perfect fit! No cheek smudges and no falling down my nose. 

So if you have a low nosebridge, consider the Asian fit. It really does exist. If only Rayban did them for prescription frames, I can finally replace my current glasses!

LinkWithin

Related Posts with Thumbnails