Monday, December 16, 2013

Swatch Souffle D'or Skin 2004 Fall/Winter - Washing Leather Straps

This Swatch takes casual wear to a new level. I bought it from the charity shop for £8. While it's made of plastic, I think it carries off as a smart looking watch. The watch face is elegant and looks like it's floating. The leather wristband however, has seen better days. 

 
I took the Swatch to the Oxford Street store and replaced the battery for £6. I also bought a new plastic translucent strap for £7. It's perfect as it's low maintenance, doesn't smell and you can get it dirty and wet. While I was there, I asked a salesperson how much she though the watch was worth and she said £80 as it was from the Skin range. I was pretty stoked to hear that!

As for the leather straps, I used Gliptone Leather cleaner spray, designed for cleaning upholstery to give them a good wash. Their products are amazing for leather. Here's what the straps looked like before-


And after three consecutive treatments, the black gunk melted off and I rinsed with cold water. It's not how you're supposed to treat leather but I had nothing to lose. And after drying, here's what the straps look like. Super clean!


Longchamp Metallic Pliage Bronze Large Shopper Bag

Only this summer was I coveting the Longchamp metallic bag which my friend bought on sale for £36. I searched high and low for the same bag but they were sold out. And now I have one for £30 from the charity shop!

There are a few pen marks inside but I figure non visible imperfections are fine and I'm not going to be as bothered keeping the bag pristine. It will inevitably get dirty over time anyway.

As I've never owned a Longchamp bag, I'm not 100% sure if this one is real however I ran a few checks from online research. Here are the characteristics of an authentic Longchamp Pliage:

1) The zipper is YKK branded.
2) The underside of the leather is not furry/shaggy.
3) The imprint of the jockey on the front flap is embossed underside.
4) You can see the fine detail on the zipper pull with the Longchamp logo and jockey. The horse's eye should be well defined.
5) The words modèle déposé at the rear of the flap must have the accent marks.
6) The dimensions of the bag and straps should match the respective bag measurements as given on the Longchamp website.
7) The rear of the snap should have a plastic disc to reinforce against the canvas.
8) The straps are double folded and not filled with tube or stuffing.

The bag fits all of these criterias so I went for it!

Thursday, November 28, 2013

OPI Silver Shatter Nail Polish

This nail polish was a steal, only 99p!

This polish dried matte so a coat of seche vite brought out the contrast. I can't wait to try other colour combinations.


Sunday, November 24, 2013

Cheaper Than Lanolips - Lansinoh Lanolin

It's been a long while since Lanolips have hit the scene in the UK. The ointment is amazing for dry winter weather and I use it all year around. It's the most comforting and long lasting lip balm and I always carry it with me. There's no scent, just soft moisturising shine and a little goes a long way. However at £11 or more for a 15ml tube is overpriced for pure lanolin. Lucky Lanosinoh is the same pure lanolin as Lanolips and it's much cheaper.

Lanosinoh is sold as nipple cream, which is why it comes in bigger tubes. I managed to buy two tubes  on Ebay (I paid less than £6 for both tubes including postage.) A 40ml tube is £10 which is much better value than Lanolips and the product is exactly the same. It even comes from Australia also.

The texture is exactly the same, thick clear and a bit sticky. No scent, just lots of protective and soothing lanolin for ultra dry hands or chapped lips. I love it! 


The Cheapest OPI and China Glaze Ever


At the 99p store! The varieties are limited to crackle polish but it's the cheapest OPI and China Glaze ever. Looks like these brands are clearing out their crackle stock. These were found in the 99p store in Camden Town.

The OPI were of course 99p each and there are a range of colours, purple, gold, pewter and red. The China Glaze was an absolute steal. But it only came in white and black crackles. You get a box of 3 of the same colours for 99p. Great stocking fillers.

Sunday, November 17, 2013

My New Blog: My Hair Growth Story


Announcing a new sister blog-My Hair Growth Story.

I've been working on a new blog about my hair growth journey. Since using oils and herbal powders, I've become increasingly interested in alternative haircare techniques. 

There are not many asian-oriental based hair care blogs. Hopefully Ayurvedic and other natural hair products will recieve the attention they deserve from anyone looking to choose all-natural for their hair.

Therefore all related hair posts will be found at My Hair Growth Story. I hope you enjoy and can benefit from my experiences! 

Sunday, November 3, 2013

The Pros And Cons Of Shikakai Powder

It's been a few weeks since I started only using all natural powders like shikakai, aritha and alma to wash my hair.

So far I'm loving it. It seems from my internet research that using powders is often used on Indian and black hair however I think it can benefit all hair types. There are so many benefits and I don't think I'll go back to normal shampoo anytime soon.

I have unusual Chinese hair. It feels brittle and I don't even heat style it. It's fine, wavy and when it's really dry, it's curly and frizzy. It also gets oily quickly.

From what I've read, herbal powders are beneficial because they are chemical free and won't overly strip oil from hair. Shikakai is good for gentle cleaning and imparting shine. Aritha is used to boost the oil removing properties of shikikai. I've only tried the alma once and was'nt too fussed about it. Perhaps I need to use it more often but I'm pretty happy with this current routine.

So I'm only using herbal powders for shampoo, silicone free conditioner and pure unrefined coconut oil, argan oil as hair moisturisers. To wash, I mix 1 tsp of shikakai (and 1 tsp of aritha if hair is really oily) with 1/4 cup of warm water in a recycled squeeze jar. I give a good shake and squeeze it on wet hair, just on the crown where most of the oil is. I massage it into the scalp, apply conditioner on the ends and leave it in on for about 3-5 minutes. Then I give it a thorough rinse. If I'm in a hurry and need to blow dry, I do it on it's lowest setting and just dry long enough for the hair to be damp. While hair is drying but still damp I distribute 4-5 drops of coconut oil or argan oil on the ends. I reapply the 2-3 drops everyday until my next wash.

The results so far are amazing. First of all my hair is not as dry as it used to be. I can tell because it takes longer for my hair to air dry. It's noticeably shinier than any other shampoo and conditioner I've used. And best of all, my hair feels healthier. It has more volume than before, a big plus!!!

From my experience here are the pros of using Shikakai:
Shinier, softer hair
Hair feels stronger at the roots, feels like there's more body
Gentle cleaning-won't overstrip oil from hair
Exfoliates scalp/no dandruff
100% natural, no chemicals
Cheap
With continued use, hair becomes less oily

And the cons:
No suds
Messier to use
Takes longer to rinse out than normal shampoo
It has a muddy smell when wet
You have to prepare it everytime (although you feel like a chemist, mixing your own concoctions, adding the right proportions of alma, aloe vera gel, aritha, etc)
If you don’t rinse it out well, hair will feel grubby (feels like there’s build up)

What it won’t do, contrary to what I’ve read is make you shed less or condition your hair. I found that using a conditioner on the ends and applying oils after is a must.

I will do another progress report in a month or so!

Friday, October 18, 2013

Shikaka, Alma, Aritha Powders and Coconut Oil For Hair


Just a quick update on my new hair regime of Ayurveda products. I just got my hair trimmed and want to change to all natural products. No sulfates, no chemicals and no silicones. 

I bought these powders and a small bottle of pure coconut oil from an Indian grocery store for £3.75. So cheap for all four products! 

For two weeks now I've only used shikakai and aritha to wash my hair and I'm still experimenting on the best way to use them. At the moment I'm putting a teaspoon of each into a small squirt bottle and adding about a cup of boiling water and massaging it to dry hair. 

The good news is that my hair feels smoother, softer and it's shinier than ever. The bad news is that even after a day of my hair being washed, it is ridiculously greasy at the back of my head. I'm going to stick to using a thick paste rather than "tea". Hopefully the oilies calm down. 

I have'nt used the alma yet but I will add it to the mix soon!

Thursday, October 17, 2013

Quick Post - Thrift Vintage Stuff

I loved Debbie Gibson when I was a kid. I would have loved this record back then. Now it's only a quid!

To buy this vintage ring, I withdrew £50 from the ATM and walked off forgetting to take the cash. Raced back to find no cash but lucky a good Samaritan saw what happened and made the person who took my money give it back!

Twelve Asterix books, all hardcover and in excellent condition. Saw these on the counter, just donated and ready to be priced. I bought the lot for £10!

Sunday, September 29, 2013

Vitapointe Leave In Conditioner Review

Just a short and sweet post about Vitapointe.

I saw it at Savers and it was really cheap £1.60 for a 30ml tube. It was the right size for travelling and you can also get the 50ml tube for £2.10 (which I bought as a second tube for home after I tried this!)

I like the simple packaging and the fact it's applied like a body moisturiser, only to hair like Vita5 Hair Booster from Australia. Feels more like I'm moisturising and not just using a serum or oil to coat hair. The conditioner is a bit oily looking and you only need a pearl size glop and no more. I spread on my palms and smooth it through my ends.

The stuff smells powdery like baby soap and it really does make dry ends feel softer. It reduces frizzies and makes my hair smell nice. I will always go back to this simple but effective stuff!

Edited to add: This stuff contains mineral oil so I've given it a rest as I'm trying to go all natural. I'm now using coconut oil.

Shikakai Powder For Hair

I was carrying this to the showers at my gym and when someone saw it, her eyes practically popped out of her head. What was in the bottle and why was I taking a shower with it?

I bought a box of shikakai powder from the supermarket after reading about the benefits. It's known to add shine, strengthens the roots, eliminates dandruff and most important to me, reduces hair loss. It was only £1.30 and it's a dried herb powder that you mix with water and clean your scalp with it.

Shikakai contains sapons which are surfactants. It mildly cleanses and the PH is 4, slightly acidic which is the right level for keeping dandruff at bay and closing hair cuticles. Shakakai basically gets rid of dirt and oil and makes hair shiny, similar to doing a apple cider vinegar rinse.

I recycled a nearly empty squeeze bottle of honey which had crystallised. I added hot water and powder to make a runny paste. Honey is good for hair, I figured. The mixture smelt muddy so add a few drops of essential oil for fragrance.

I wet my hair and applied it to my scalp and massaged it in. There were no suds and it was gritty, like a scrub. I let it sit in my hair while I was doing my normal shower routine. When I rinsed, I could instantly feel my hair was softer and smoother. It was amazing!

When my hair dried, it smelt a little muddy (because I did'nt add fragrance) but it subsided after a few hours. Let this be a warning if you're planning to use it when you're going to be around other people-use essential oil!  My scalp felt like it had been scrubbed clean and even though I didn't use conditioner, I didn't feel like I needed to.

I like shikakai because it's all natural, cheap and mild on my hair. Good for gentle and frequent cleaning as my fine hair looks dirty by the second day of washing. As for reducing hair loss, I'll keep using it and let you know how I get on!

Monday, August 19, 2013

Washing and Conditioning a Worn Out Leather Bag

I bought a Marc Jacobs Tina turnlock tote at the charity shop for £55! It needed a good cleaning inside and out as the lining looked like eyeshadow had exploded on it and the leather was dry in some places. With a little TLC, I knew I could revive the bag and make it an aged treasure.

The most effective way of cleaning the lining was hand washing. While I don't recommend this on very expensive leather bags, I did'nt have too much to risk because the leather is dark brown so water stains was'nt too much of an issue.  

Step one: I turned out the lining and washed it thoroughly with detergent and warm water, being careful not to let the leather get wet. Keep a towel handy for sopping up splashes. When the water ran clear, I wrung it out and hung it up to dry, keeping the lining kept separate from the leather. 

Step 2: When the lining is completely dry, turn it back inside. Now it's time to condition the leather. I use Wheelers leather balm which is made from beeswax and is perfect for moisturising. Make sure the leather is clean so wipe it down if needed and unfasten buckles so you can access all areas. I squirt a 10p amount of balm on my palm and massage the leather all over with my hands. Pay attention to edges and dry areas. Keep applying more balm and work the leather until it feels like the upper layer is saturated. 

Step 3: Hang the bag up to dry over night. It will be a little sticky on the surface but the bag will be usable after a quick buff. With further use the leather will suck up the balm throughout and be lusciously thick and supple.

The bag is ready for use and the leather will beautify with age.

Tah dah! A reconditioned bag with smooshy buttery leather. 

Saturday, August 17, 2013

DIY Nail Repair With A Teabag And Nail Glue

My pet hate when growing nails is accidentally ripping them across the nail bed. However accidents happen and a tiny little tear turned into this as I was getting dressed. Quelle horreur! As you can see, the rip is over the pink of the nail and there was no way I was going to cut off the hanging bit.

I went to two beauticians near my work but they were both booked out. I had to resort to a DIY nail repair and it turned out to be effective and cheap, using nail glue and a teabag.


1) Start with a clean and dry nail.

2) Take a teabag and cut two small rectangles to fit over the tear, one larger than the other.

3) Place the smaller rectangle over the tear, add one drop of nail glue and use a paper clip to ensure that the paper covers the tear. Work quickly because the glue dries fast. (It's easier to handle with tweezers but I didn't want glue on mine.) 

4) The glue should still be a little gummy for the larger teabag piece. Center it over the first piece and add another drop of glue. Ensure that the pieces are well adhered, leaving no air bubbles.

5) Add another drop of glue or two to seal. Let the glue dry completely.

6) File the glued area with a course nail file. Then use a smoother file to buff the surface.

7) Here's the finished work-broken nail fixed! You can paint over the repair but nail polish remover will dissolve the glue (especially if using acetone). You will need to repeat this process until the tear grows out. 

Wednesday, August 7, 2013

Rayban Wayfarer 2140-A Asian Fit. Yes It Exists!

If you're Asian, chances are you've had problems fitting big plastic frames. I've wanted Rayban Wayfarers for ages but they they slide down my face. When I smile, my cheeks smudge the lenses. Ever had this happen to you?

It's especially frustrating because I wear glasses and have the same problems finding  frames. I have two pairs of new glasses going to waste because they don't fit and stick on silicone nosepads fall off. I'm still wearing the same plastic frames from 10 years ago because they actually fit me! The glasses are made by Ray Ban so they must be doing something right-especially when I found out they make an Asian Fit for Wayfarers.

I managed to track them down on Smartbuyglasses (known as Visiondirect in Australia). The catch is that I had to wait months for my order to be located in Hong Kong, sent to the company's warehouse and then dispatched. The latter step was really quick because they use a courier service, however they did at first send a normal fit pair in error and that was after six weeks of waiting! They offered a 5% discount for waiting (twice) so it worked out to only cost £80 including shipping. However these ones are made for the Asian face which is better than anything I could buy on the high street. 

The first I noticed was the frames are huge for a 54mm lens. So ladies, be aware this is the bug eyed version. Most opt for the 50mm lens and the classic style is the 47mm (which I found too small for my face.) 

The nose pads are more prominent than normal and I think narrower too (perhaps this might just be because of the 54mm lens version). I will have to get the arms adjusted so they fit around my ears but after that, they are a perfect fit! No cheek smudges and no falling down my nose. 

So if you have a low nosebridge, consider the Asian fit. It really does exist. If only Rayban did them for prescription frames, I can finally replace my current glasses!

Monday, July 22, 2013

My Thrift Shop Haul

You know that saying "when it rains it pours"? That's how it feels like when I'm charity shopping. There will be many times where I'll walk away with nothing or in this case, I've found three dresses and a handbag and clutch. All stuff I need!

1) Body con dress £6.50
2) Mango duffel bag £9 and Banana Republic clutch £7
3) Vintage shift dress £6.50
4) Warehouse peplum dress £6.50

Sunday, June 23, 2013

Bioderma H2O Sensibo vs Pure Beauty Perfect Cleansing Water

I was obsessing over the Bioderma micellar water. Goodness knows why since I have every kind of makeup remover there is, including cleansing water from Asia.

What intrigued me was that you did'nt have to rinse it off. Which is brilliant for when I'm too lazy to cleanse before bedtime.

I managed to hunt down a London stockist, John Bell & Croyden, near Bond St tube station. The 100ml bottle is perfect for travelling and it's £4.50. (Of course it's much cheaper to buy it in bigger bottles, and if you get it in France.) 

I could'nt help noticing another woman in the queue to pay with the same bottle, probably on the same mission to try this stuff.

I wanted to test the difference between the Bioderma and Pure Beauty versions of micelluar water since they looked the same. On the outside the only difference was the packaging (in which the pump instantly wins). Pure Beauty is made in Korea and Bioderma is made in France. Pure Beauty is cheaper and is only available in Asia. The feel and the appearance of both products is the same. Both are non fragranced. 


Just a warning the next pic is kinda gross. I removed one side of my makeup with each of cleansing waters and here are the results. As you can see, the right pad removed more makeup than the left. Guess which is which?

First of all, while they felt the same on the skin, Pure Beauty left a thin greasy residue. The instructions said you need to need to rinse off and I agree. The Bioderma left a very faint residue, something I can easily overlook if I'm tired or if the air is dry. However in both cases I don't feel thoroughly cleansed unless rinsing is involved.  

In terms of effectiveness, Pure Beauty is the one on the right. If I need to wash my face afterwards in both cases, I prefer Pure Beauty as it removes more makeup. 

Later I found out that the Nuxe cleansing water sample I had in storage was also a micellar solution. It works similar to Bioderma and smells heavenly.

Cleansing oil is still my favourite form of remover. There's no faffing about with wiping/friction and dirty cotton pads. It was nice to try cleansing water but they are no different to conventional make up removers. Except they're less effective (harder to remove waterproof mascara) and their appearance is like water. 

Has you tried Bioderma H2O? What do you think of it?

Tangle Teezer - Are They Worth It?

Some people at my work can probably tell, I hate brushing my hair. Passing a brush through my hair meant snagging and frizzing so I avoid it. One day I forgot to carry my Denman shampoo brush and thought I'd try the Tangle Teezer.

My friend had recommended them after she got a haircut at Headmasters and found the brush to feel amazing on her scalp. She rang them the next day to ask what they used and now has three Tangle Teezers of the normal size. I them found too big for my hand so I bought the compact styler, which comes with a handy snap-on bristle protector. It's useful since the bristles are really soft and would trap a lot of dust in my handbag.

I bought this compact for £10.20 including shipping on Ebay. You can also buy them for less than RRP on Amazon. I like the leopard print as it stands out in my bag.

A side view. The compact styler is the perfect size and has a bit of weight. I'm less likely to drop it or have it fly out of my hand when using it.

The bristles are softer and more flexible than the Denman shampoo brush. If you have thick hair, you'll need to use it in sections as it may not pass through all of your hair. On my hair, it does the job nicely and gives a gentle scalp massage.

So the verdict? I think Tangle Teezers are worth it as it does what it says. It's a stylish functional accessory. The bristles are gentle on my fine hair. Tangles are easy to brush out and my hair is smooth and tamed. I don't hesitate to brush now. That's also good for my colleagues, ha ha! 

Bargain Marni Cropped Blazer


These days it's hard to snag a designer bargain in charity shops since they usually check labels before naming their prices. Especially in the shops in my area but I got lucky today! 

I left my flat this morning realising my cardigan wasn't going to cut it in this un-summer weather. I was running late so I just had to wing it. However by the time I got to Hampstead Heath for the train, I  had to go into the charity shop to see if I could find something else to keep me warm. 

The very first thing that caught my eye was this cropped blazer. It's
 pilot's blazer style. I took a closer look and saw it was Marni and priced at £10! It wasn't in the designer clothes section so perhaps someone made a mistake?

But who was I to complain? I was chilly, in a rush and found a designer bargain. It didn't go with my outfit but who cares, it's my first Marni for a steal!


Friday, June 21, 2013

How to Remove Shellac At Home

I had Shellac done for the first time and I liked it! 

The difference between Shellac and Bio Gel is that it's easier to apply because Shellac comes in bottles like nail polish.  It looks more natural and it's more porous to let the nails breathe.

Shellac lasts 2-3 weeks which is perfect because by then I have about 3mm of regrowth anyway and should be removed. Two nails peeled after two weeks and I couldn't stop picking off the gel. 

I had such a bad experience with gel removal in the past, I refuse to have a salon do it. Especially when it can be done easily at home. And guess what, for Shellac you don't even have to use 100% acetone. A good nail polish remover will work provided it contains acetone. 

So you need a rough nail file, acetone nail polish remover (I used Cutex Nourishing for weak nails), foil, cotton wool and an orange stick. 

Best to do one hand at a time. Here is a step by step guide.

1) Prepare the foil by cutting 5cm x 15cm strips and fold them over so they double layered. This makes them stronger and easier to handle. Cut the cotton wool in to pieces to fit over your nails.  
2) Rough up the entire surface of the gel with the file. Don't be too gentle. You want to get rid of the top coat.
2)  One nail at a time, saturate a piece of cotton wool with nail polish remover, place on the nail and wrap the foil closely around the fingertip and then fold the open end over the nail to secure.

3) Once done for all nails, let them soak for 10 mins. Check the first nail and if it looks like the below pic, it's ready for removal with the orange stick. Unwrap and scrape one nail at a time.  The gel should come off easily. If not, soak for another few minutes, making sure the cotton wool is saturated.


Once the nails are clear of gel, you can give them a quick buff if you wish. Wash hands to remove residual chemicals and slather on a rich handcream. Apply cuticle oil and now you have fresh natural nails!

Sunday, June 2, 2013

Zara Hankerchief Palazzo Pants

Comfy and satiny. Perfect for "fat days". It was supposed to be warm today but ankle boots and wool crop jumper was in order.

While I was waiting for a bus, an little old lady gently tugged at my palazzo pants and asked where I bought them from. We had a conversion and she said she's from
Laos. She was wearing basic comfy pants of her own, rubber flip flops and a blue dressing gown.

She really wanted to know where I bought my pants from because they obviously looked comfy and apparently hers need replacing. Bless her!

Tuesday, May 28, 2013

Bicester Village Outlet - Mulberry Somerset Purse and YSL Arty Ring

I went to the Cotswolds and did a bit of shopping at Bicester Village. There are heaps of outlets but I only walked into a very select few and bought my first Mulberry.


It's just a small purse. I like ones I can fit in my hand. This is the Somerset zip around purse in chocolate. The leather is pebbled and smells amazing. It was £150, reduced to £105.

And I finally bought a YSL Arty ring. This is a size 6 which fits comfortably on my middle fingers. It was £165, reduced to £110 plus 50% off. I won't say it was a steal because it's basically acrylic and gold plated brass, however £55 is a pretty good deal. There are quite a few Arty rings left in different styles and sizes, even in 4 (no Ovale ones though). 

I found out later that the Arty ring will be discontinued soon so that's why they've gone on sale! Doh :( 

Friday, May 24, 2013

Vaseline Hand And Nail Lotion

Although the label has modernised from the product I used as a teenager, the results are still the same. This hand lotion is the best value and it really works to make hands soft and nails strong. 

You can buy Vaseline Hand and Nail lotion cheaply in the UK. I started using it again a month or so ago and after I got used to the scent (not as nice as how I remembered or different to back home in Oz) I can't bear to be with out it. My nails have actually strengthened so much that I can grow out white crescents and not break.

I could never grow my nails and now look! I like how healthy my nails feel and look so much that I'm not even wearing nail polish anymore. So if you think your nails are brittle, definitely give this a try. It took a week for me to notice a difference to the appearance and strength of my nails. I love it! 


Saturday, May 18, 2013

Cat Eye Sunglasses

A new charity shop opened up on my street. Whoopee! I love Saturday mornings in London. 

I went for a stroll today to the shops and bought a dress, scarf and these sunglasses. 

They make a statement don't they? 

Monday, April 15, 2013

Paraffin Wax Pedicure

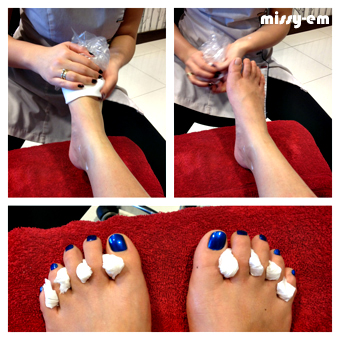
I just had the best luxe pedicure at La Rafayel On The Left Bank. My beautician was wonderful and paid fine attention to detail. After soaking, filing and scrubbing, my feet were painted with hot liquid wax. It can be too hot for some, but I quite liked the heat and it cools to a tolerable temperature quickly. Once my feet were coated, she covered them with plastic bags and let sit for 10 mins. It feels soothing but looks odd!

Then all she did to remove was rolled the wax off with the bag. The wax, still warm and soft peeled off cleanly. I was really impressed. My feet felt so soft afterwards. 

And the paint job was amazing. Looks like liquid plastic-so smooth and shiny. I was really happy with the results and felt so pampered. Can't wait to have this done again!


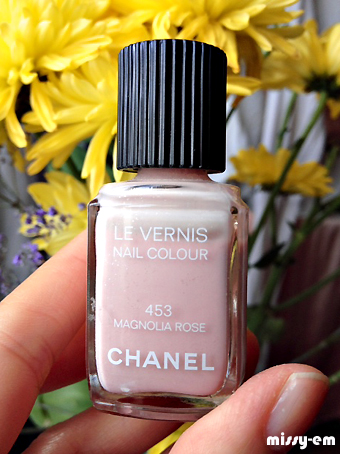
Chanel Le Vernis Nail Polish #453 Magnolia Rose

I bought this polish to see how Chanel polishes faired compared to cheaper brands. There's mainly one thing I like about Chanel polishes and that's their unique timeless colours. And Magnolia Rose is no exception. This colour is very pretty and has a subtle shimmer. You'll need to apply generously as otherwise it will look streaky. 

I'm letting it go on Ebay because it's too similar to this polish already in my collection. 


Sunday, April 7, 2013

A Newbie's Guide To The Brazilian/Hollywood Wax

Let me assure you now that it will hurt like hell the first time.

The Brazilian takes everything off except a thin strip at the front. The Hollywood takes it all off.

It helps to take a painkiller or a stiff drink beforehand if your pain threshold is low. But the more often you do it, the pain lessens and eventually with a good waxer, you'll barely  flinch. The trick is to stay as relaxed as possible and take a deep breaths.

Don't worry about being in an unlady-like position. You will be told to spread 'em, pull your bits taut and hold your legs over your head. The professional waxer has seen it and heard it all. (Seeing embarrassed clients and hearing the screams of pain, that is!)

Having said all this, if you can, have it done in the comfort and privacy of your home.

As for the process, start off with hair about 1 cm long. If it's too long, it will make the job even more painful. The waxer will apply some talcum powder for better grip and wax a small area at a time, usually from the top then downwards. It takes about 5-10 mins and when it's over, treat yourself to (perhaps another) stiff drink or treats. You're smooth, soft and survived!

The area will be red and tender for a day or two. This is normal. Good luck!


Wednesday, March 27, 2013

L'Oreal Refinish Microdermabrasion Kit - The Way To New Skin

I was flicking through photos on Facebook and realised my face has aged over the past few years. I decided my new goal was to improve my skin and take better care of it. 

So just a little about my skin. I have large pores and uneven skin tone. Blackheads and pigmentation-I have alot. Fine wrinkles on my forehead are starting to set in.

A few years ago I was recommended chemical peels, in preparation for a 10 year high school reunion. It hurt like hell, like my face was set on fire and then my skin slowly fell off in sheets. Although I got super smooth clear skin, there's no way I'm not going through that again!

Later I had microdermabrasion done by a beautician. My face was smooth and soft after but I did'nt like the method. They used a machine that sucked on my skin for tension and the nozzle was metal and abrasive like a nail file. It was like sanding my face.

So now I want to give a home treatment of microdermabrasion a go. My girlfriend recommended the L'Oreal Refinish Kit. She says it's the best she's ever used and the moisturiser is apparently amazing. The bad news is that it's discontinued in stores but you can still buy it from Ebay. I bought a kit which came from Belgium and the seller provided English instructions. 

The kit comes in two steps. The first is exfoliation and the cream contains aluminium oxide micro crystals. It's gritty and can feel it on your face. I'd say it's on the uncomfortable/sharp side but I guess it needs to be abrasive to do what it's supposed to. After distributing it evenly, rub it gently in circles for a minute and no more. Then rinse off.

Step 2 is moisturising. This cream contains SPF which is needed after a treatment. It sunk straight into my skin which means it's a good formulation and that the microdermabrasion worked. My skin felt radiant and baby soft.

I got a little redness on my face but that went away after a day. I'd recommend doing this before you go to bed the first time, just to give your skin a chance to recover before going out in public. 

I have new soft skin and my pores are less visible. Extractions are super easy. I'm really impressed with this product. So happy in fact, that I bought another THREE boxes on Ebay. Yup, I'm stockpiling!

The instructions say to use it twice a week. I'll post an update here after a few weeks. Can't wait for things to get even better.


Sunday, March 10, 2013

Burberry Lip Cover - Ruby No 18 & Effortless Mascara


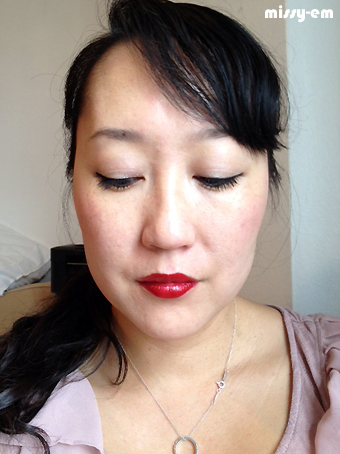
When my girlfriend left Burberry, I got to use her discount for makeup. I bought Effortless mascara and a Lip Cover in Ruby, the perfect go-to red lippie.

Lip Cover is the range of Soft Satin lipsticks and it certainly lives to it's name. It's silky soft the second it's applied. Glides on like a dream and it's well pigmented. I totally love the packaging. Shiny and slick with the trademark plaid pint, both on the case and embedded into the lipstick. The cap holds on with a magnet which is really cool. It's an ornate addition to my makeup collection. 

The colour is long lasting however it does feather a bit (possibly because I did'nt use a lip liner) and feels dry after four hours. But the creaminess, colour payout and packaging design makes up for it. Received many compliments on the colour. I love it!


I'm also wearing Burberry Effortless mascara in Midnight Black. I did'nt think it was anything special at first because the formula was fresh and wet. However a after a few uses, it gives good length and volume. I guess it needed to dry up a bit in the tube first. It's long lasting and hardly smudges. And like the lipstick, I love the trademark Burberry packaging. 


LinkWithin

Related Posts with Thumbnails